Isrlygood1 (talk | contribs) mNo edit summary |
Isrlygood1 (talk | contribs) mNo edit summary |
||
| Line 26: | Line 26: | ||
File:Black Bony.png|link=Black Bony|[[Black Bony]] |
File:Black Bony.png|link=Black Bony|[[Black Bony]] |
||
File:Boil.png|link=Boil|[[Boil]] |
File:Boil.png|link=Boil|[[Boil]] |
||
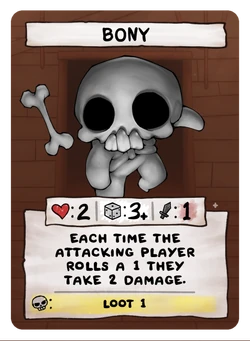
| + | File:Bony.png|link=Bony|[[Bony]] |
||
File:Boom Fly.png|link=Boom Fly|[[Boom Fly]] |
File:Boom Fly.png|link=Boom Fly|[[Boom Fly]] |
||
| + | File:Brain.png|link=Brain|[[Brain]] |
||
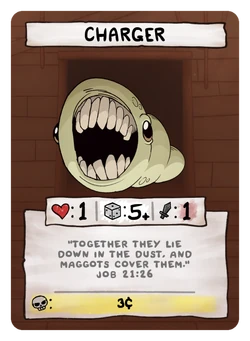
File:Charger.png|link=Charger|[[Charger]] |
File:Charger.png|link=Charger|[[Charger]] |
||
File:Clotty.png|link=Clotty|[[Clotty]] |
File:Clotty.png|link=Clotty|[[Clotty]] |
||
| Line 39: | Line 41: | ||
File:Fat Bat.png|link=Fat Bat|[[Fat Bat]] |
File:Fat Bat.png|link=Fat Bat|[[Fat Bat]] |
||
File:Fatty.png|link=Fatty|[[Fatty]] |
File:Fatty.png|link=Fatty|[[Fatty]] |
||
| + | File:Flaming Hopper.png|link=Flaming Hopper|[[Flaming Hopper]] |
||
File:Fly.png|link=Fly|[[Fly]] |
File:Fly.png|link=Fly|[[Fly]] |
||
File:Gaper.png|link=Gaper|[[Gaper]] |
File:Gaper.png|link=Gaper|[[Gaper]] |
||
| + | File:Globin.png|link=Goblin|[[Goblin]] |
||
File:Greedling.png|link=Greedling|[[Greedling]] |
File:Greedling.png|link=Greedling|[[Greedling]] |
||
File:Hanger.png|link=Hanger|[[Hanger]] |
File:Hanger.png|link=Hanger|[[Hanger]] |
||
| Line 55: | Line 59: | ||
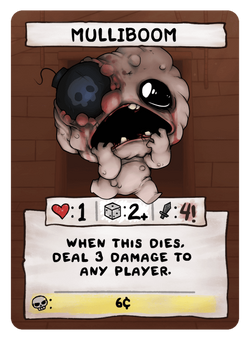
File:Mulliboom.png|link=Mulliboom|[[Mulliboom]] |
File:Mulliboom.png|link=Mulliboom|[[Mulliboom]] |
||
File:Mulligan.png|link=Mulligan|[[Mulligan]] |
File:Mulligan.png|link=Mulligan|[[Mulligan]] |
||
| + | File:Nerve Ending.png|link=Nerve Ending|[[Nerve Ending]] |
||
File:Pale Fatty.png|link=Pale Fatty|[[Pale Fatty]] |
File:Pale Fatty.png|link=Pale Fatty|[[Pale Fatty]] |
||
File:Parabite.png|link=Parabite|[[Parabite]] |
File:Parabite.png|link=Parabite|[[Parabite]] |
||
| Line 65: | Line 70: | ||
File:Ring of Flies.png|link=Ring of Flies|[[Ring of Flies]] |
File:Ring of Flies.png|link=Ring of Flies|[[Ring of Flies]] |
||
File:Round Worm.png|link=Round Worm|[[Round Worm]] |
File:Round Worm.png|link=Round Worm|[[Round Worm]] |
||
| + | File:Roundy.png|link=Roundy|[[Roundy]] |
||
File:Spider.png|link=Spider|[[Spider]] |
File:Spider.png|link=Spider|[[Spider]] |
||
File:Squirt.png|link=Squirt|[[Squirt]] |
File:Squirt.png|link=Squirt|[[Squirt]] |
||
File:Stoney.png|link=Stoney|[[Stoney]] |
File:Stoney.png|link=Stoney|[[Stoney]] |
||
| + | File:Sucker.png|link=Sucker|[[Sucker]] |
||
| + | File:Swarmer.png|link=Swarmer|[[Swarmer]] |
||
File:Swarm of Flies.png|link=Swarm of Flies|[[Swarm of Flies]] |
File:Swarm of Flies.png|link=Swarm of Flies|[[Swarm of Flies]] |
||
File:Trite.png|link=Trite|[[Trite]] |
File:Trite.png|link=Trite|[[Trite]] |
||
| + | File:Tumor.png|link=Tumor|[[Tumor]] |
||
File:Wizoob.png|link=Wizoob|[[Wizoob]] |
File:Wizoob.png|link=Wizoob|[[Wizoob]] |
||
</gallery> |
</gallery> |
||
| Line 78: | Line 87: | ||
File:Cursed Fatty.png|link=Cursed Fatty|[[Cursed Fatty]] |
File:Cursed Fatty.png|link=Cursed Fatty|[[Cursed Fatty]] |
||
File:Cursed Gaper.png|link=Cursed Gaper|[[Cursed Gaper]] |
File:Cursed Gaper.png|link=Cursed Gaper|[[Cursed Gaper]] |
||
| + | File:Cursed Globin.png|link=Cursed Goblin|[[Cursed Goblin]] |
||
File:Cursed Horf.png|link=Cursed Horf|[[Cursed Horf]] |
File:Cursed Horf.png|link=Cursed Horf|[[Cursed Horf]] |
||
File:Cursed Keeper Head.png|link=Cursed Keeper Head|[[Cursed Keeper Head]] |
File:Cursed Keeper Head.png|link=Cursed Keeper Head|[[Cursed Keeper Head]] |
||
File:Cursed Mom's Hand.png|link=Cursed Mom's Hand|[[Cursed Mom's Hand]] |
File:Cursed Mom's Hand.png|link=Cursed Mom's Hand|[[Cursed Mom's Hand]] |
||
File:Cursed Psy Horf.png|link=Cursed Psy Horf|[[Cursed Psy Horf]] |
File:Cursed Psy Horf.png|link=Cursed Psy Horf|[[Cursed Psy Horf]] |
||
| + | File:Cursed Tumor (1).png|link=Cursed Tumor|[[Cursed Tumor]] |
||
| + | File:Holy Bony.png|link=Holy Bony|[[Holy Bony]] |
||
File:Holy Dinga.png|link=Holy Dinga|[[Holy Dinga]] |
File:Holy Dinga.png|link=Holy Dinga|[[Holy Dinga]] |
||
File:Holy Dip.png|link=Holy Dip|[[Holy Dip]] |
File:Holy Dip.png|link=Holy Dip|[[Holy Dip]] |
||
File:Holy Keeper Head.png|link=Holy Keeper Head|[[Holy Keeper Head]] |
File:Holy Keeper Head.png|link=Holy Keeper Head|[[Holy Keeper Head]] |
||
File:Holy Mom's Eye.png|link=Holy Mom's Eye|[[Holy Mom's Eye]] |
File:Holy Mom's Eye.png|link=Holy Mom's Eye|[[Holy Mom's Eye]] |
||
| + | File:Holy Mulligan.png|link=Holy Mulligan|[[Holy Mulligan]] |
||
File:Holy Squirt.png|link=Holy Squirt|[[Holy Squirt]] |
File:Holy Squirt.png|link=Holy Squirt|[[Holy Squirt]] |
||
</gallery> |
</gallery> |
||
| Line 92: | Line 105: | ||
Strong enemies that always have a soul as a reward. |
Strong enemies that always have a soul as a reward. |
||
<gallery widths=250px heights=341px mode=nolines> |
<gallery widths=250px heights=341px mode=nolines> |
||
| + | File:Blastocyst.png|link=Blastocyst|[[Blastocyst]] |
||
File:Carrion Queen.png|link=Carrion Queen|[[Carrion Queen]] |
File:Carrion Queen.png|link=Carrion Queen|[[Carrion Queen]] |
||
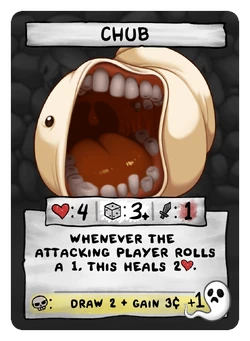
File:Chub.png|link=Chub|[[Chub]] |
File:Chub.png|link=Chub|[[Chub]] |
||
| Line 99: | Line 113: | ||
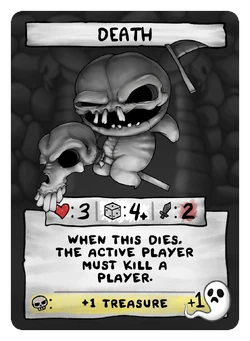
File:Death.png|link=Death|[[Death]] |
File:Death.png|link=Death|[[Death]] |
||
File:Delirium.png|link=Delirium|[[Delirium]] |
File:Delirium.png|link=Delirium|[[Delirium]] |
||
| + | File:Dingle.png|link=Dingle|[[Dingle]] |
||
File:Duke of Flies.png|link=Duke of Flies|[[Duke of Flies]] |
File:Duke of Flies.png|link=Duke of Flies|[[Duke of Flies]] |
||
File:Envy.png|link=Envy|[[Envy]] |
File:Envy.png|link=Envy|[[Envy]] |
||
| Line 109: | Line 124: | ||
File:Gurdy.png|link=Gurdy|[[Gurdy]] |
File:Gurdy.png|link=Gurdy|[[Gurdy]] |
||
File:Gurglings.png|link=Gurglings|[[Gurgling]] |
File:Gurglings.png|link=Gurglings|[[Gurgling]] |
||
| + | File:Headless horseman.png|link=Headless Horseman]] |
||
| + | File:Krampus.png|link=Krampus|[[Krampus]] |
||
File:Larry Jr.png|link=Larry Jr|[[Larry Jr]] |
File:Larry Jr.png|link=Larry Jr|[[Larry Jr]] |
||
File:Little Horn.png|link=Little Horn|[[Little Horn]] |
File:Little Horn.png|link=Little Horn|[[Little Horn]] |
||
| Line 115: | Line 132: | ||
File:Mega Fatty.png|link=Mega Fatty|[[Mega Fatty]] |
File:Mega Fatty.png|link=Mega Fatty|[[Mega Fatty]] |
||
File:Monstro.png|link=Monstro|[[Monstro]] |
File:Monstro.png|link=Monstro|[[Monstro]] |
||
| + | File:Monstro II.png|link=Monstro II|[[Monstro II]] |
||
File:Peep.png|link=Peep|[[Peep]] |
File:Peep.png|link=Peep|[[Peep]] |
||
File:Pestilence.png|link=Pestilence|[[Pestilence]] |
File:Pestilence.png|link=Pestilence|[[Pestilence]] |
||
| Line 126: | Line 144: | ||
File:The Bloat.png|link=The Bloat|link=The Bloat|[[The Bloat]] |
File:The Bloat.png|link=The Bloat|link=The Bloat|[[The Bloat]] |
||
File:The Cage.png|link=The Cage|[[The Cage]] |
File:The Cage.png|link=The Cage|[[The Cage]] |
||
| + | File:The Fallen.png|link=The Fallen|[[The Fallen]] |
||
File:The Haunt.png|link=The Haunt|[[The Haunt]] |
File:The Haunt.png|link=The Haunt|[[The Haunt]] |
||
File:War.png|link=War|[[War]] |
File:War.png|link=War|[[War]] |
||
| + | File:Widow.png|link=Widow|[[Widow]] |
||
File:Wrath.png|link=Wrath|[[Wrath]] |
File:Wrath.png|link=Wrath|[[Wrath]] |
||
</gallery> |
</gallery> |
||
| Line 146: | Line 166: | ||
<gallery widths=250px heights=341px mode=nolines> |
<gallery widths=250px heights=341px mode=nolines> |
||
File:Ambush.png|link=Ambush|[[Ambush]] |
File:Ambush.png|link=Ambush|[[Ambush]] |
||
| + | File:Angel Room.png|link=Angel Room|[[Angel Room]] |
||
| + | File:Boss Rush.png|link=Boss Rush|[[Boss Rush]] |
||
File:Chest.png|link=Chest|[[Chest]] |
File:Chest.png|link=Chest|[[Chest]] |
||
File:Cursed Chest.png|link=Cursed Chest|[[Cursed Chest]] |
File:Cursed Chest.png|link=Cursed Chest|[[Cursed Chest]] |
||
| Line 152: | Line 174: | ||
File:Gold Chest.png|link=Gold Chest|[[Gold Chest]] |
File:Gold Chest.png|link=Gold Chest|[[Gold Chest]] |
||
File:Greed!.png|link=Greed!|[[Greed!]] |
File:Greed!.png|link=Greed!|[[Greed!]] |
||
| + | File:Head Trauma.png|link=Head Trauma|[[Head Trauma]] |
||
| + | File:Holy Chest.png|link=Holy Chest|[[Holy Chest]] |
||
File:I Am Error.png|link=I Am Error|[[I Am Error]] |
File:I Am Error.png|link=I Am Error|[[I Am Error]] |
||
File:I Can See Forever.png|link=I Can See Forever|[[I Can See Forever]] |
File:I Can See Forever.png|link=I Can See Forever|[[I Can See Forever]] |
||
| Line 157: | Line 181: | ||
File:Secret Room.png|link=Secret Room|[[Secret Room]] |
File:Secret Room.png|link=Secret Room|[[Secret Room]] |
||
File:Shop Upgrade.png|link=Shop Upgrade|[[Shop Upgrade]] |
File:Shop Upgrade.png|link=Shop Upgrade|[[Shop Upgrade]] |
||
| + | File:Spiked Chest.png|link=Spiked Chest|[[Spiked Chest]] |
||
File:Troll Bombs.png|link=Troll Bombs|[[Troll Bombs]] |
File:Troll Bombs.png|link=Troll Bombs|[[Troll Bombs]] |
||
File:We Need to go Deeper.png|link=We Need to go Deeper|[[We Need to go Deeper]] |
File:We Need to go Deeper.png|link=We Need to go Deeper|[[We Need to go Deeper]] |
||
| Line 166: | Line 191: | ||
<gallery widths=250px heights=341px mode=nolines> |
<gallery widths=250px heights=341px mode=nolines> |
||
File:Curse of Amnesia.png|link=Curse of Amnesia|[[Curse of Amnesia]] |
File:Curse of Amnesia.png|link=Curse of Amnesia|[[Curse of Amnesia]] |
||
| + | File:Curse of Blood Lust.png|link=Course of Blood Lust|[[Curse of Blood Lust]] |
||
File:Curse of Fatigue.png|link=Curse of Fatigue|[[Curse of Fatigue]] |
File:Curse of Fatigue.png|link=Curse of Fatigue|[[Curse of Fatigue]] |
||
File:Curse of Greed.png|link=Curse of Greed|[[Curse of Greed]] |
File:Curse of Greed.png|link=Curse of Greed|[[Curse of Greed]] |
||
| + | File:Curse of Impulse.png|link=Curse of Impulse|[[Curse of Impulse]] |
||
File:Curse of Loss.png|link=Curse of Loss|[[Curse of Loss]] |
File:Curse of Loss.png|link=Curse of Loss|[[Curse of Loss]] |
||
File:Curse of Pain.png|link=Curse of Pain|[[Curse of Pain]] |
File:Curse of Pain.png|link=Curse of Pain|[[Curse of Pain]] |
||
Revision as of 06:18, 30 January 2019
| This article is a stub. You can help The Binding of Isaac: Four Souls Wiki by expanding it. |
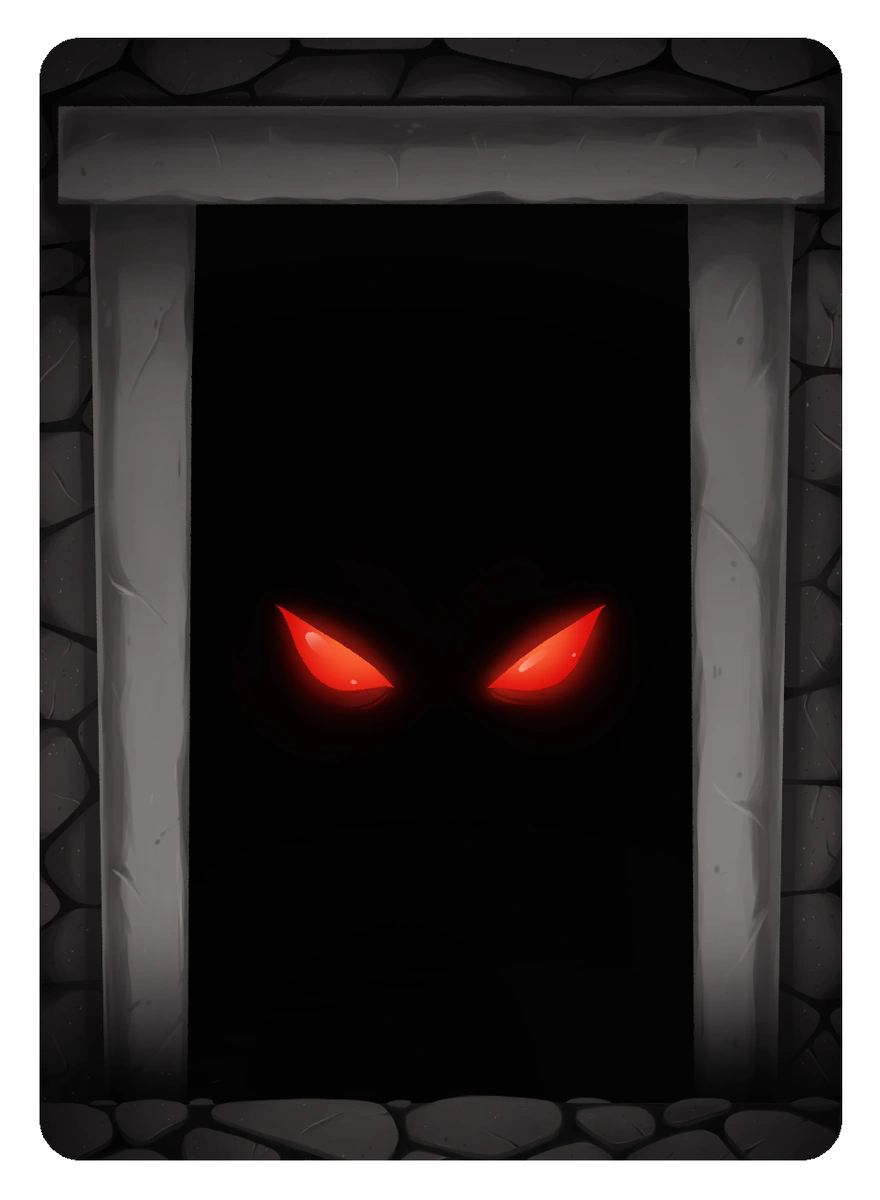
The Monster deck contains monsters, bosses, treasures, and curses. There are 100 Monster cards in the base came, and an extra 20 in the gold box expansion.
Gameplay
2 Monster cards must be in play at all times, when it's your turn you May choose to attack 1 of the 2 monsters in play, or attack the top card in the Monster deck, putting that card on top of one of the 2 cards already there. You Must keep attacking until either the monster dies, or you die. When you kill a monster, get your reward and replace the card.
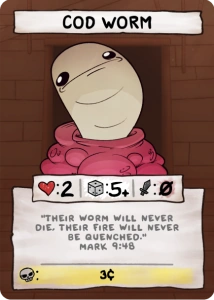
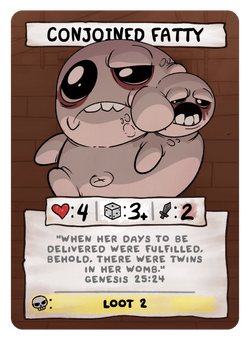
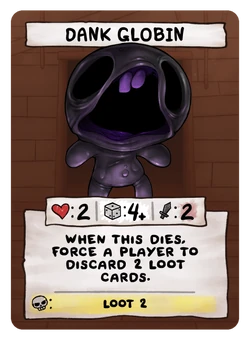
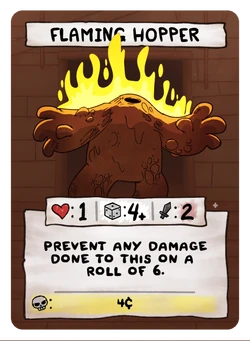
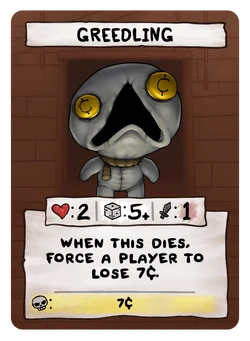
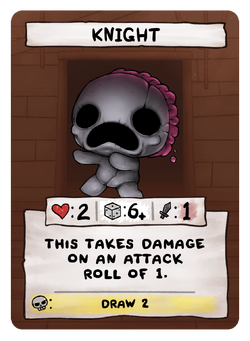
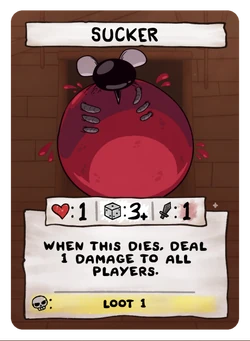
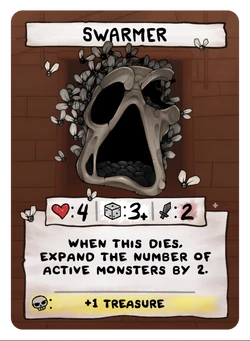
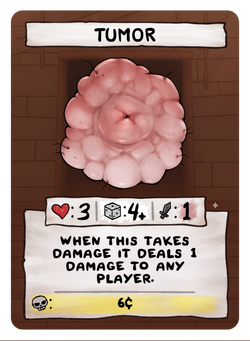
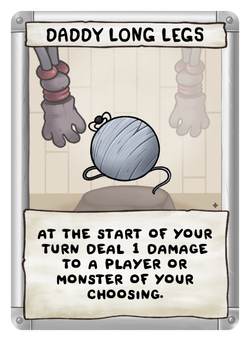
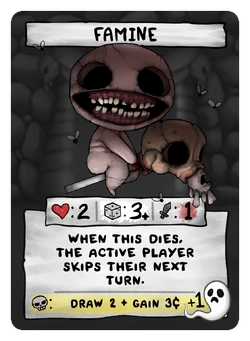
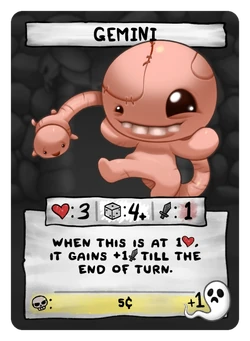
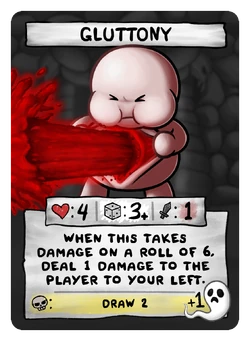
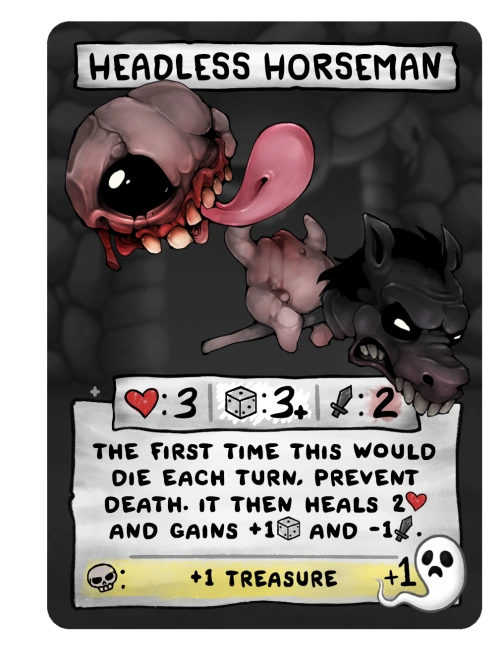
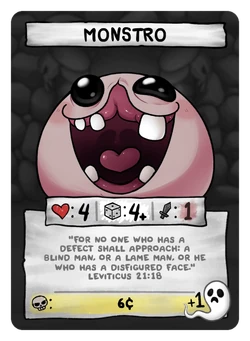
There are 4 parts to a Monster / Boss / Mega Boss
![]() Health: The amount of health the monster has
Health: The amount of health the monster has
![]() Dice Roll: The roll you have to get to damage the monster, when you get that roll or more, you will damage that monster equal to the damage shown on your player card (including items or anything that boost your damage)
Dice Roll: The roll you have to get to damage the monster, when you get that roll or more, you will damage that monster equal to the damage shown on your player card (including items or anything that boost your damage)
![]() Damage to Player: The amount of damage that's done to the player if the player misses (not rolling a high enough number)
Damage to Player: The amount of damage that's done to the player if the player misses (not rolling a high enough number)
![]() Rewards: When the Monster is killed, the reward the player gets
Rewards: When the Monster is killed, the reward the player gets
List of cards
Basic monsters
Usually weaker enemies that have lesser rewards.
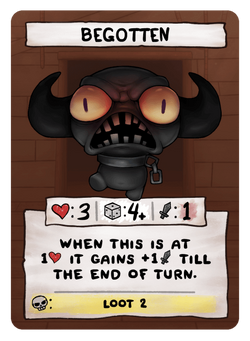
Begotten
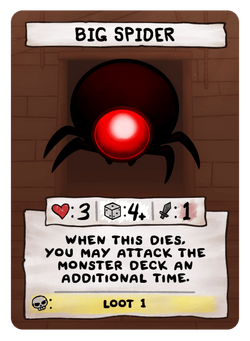
Big Spider
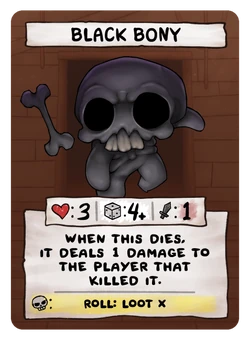
Black Bony

Boil
Bony
Boom Fly
Brain
Charger
Clotty
Cod Worm
Conjoined Fatty
Dank Goblin
Death's Head
Dinga
Dip
Dople
Evil Twin
Fat Bat
Fatty
Flaming Hopper
Fly
Gaper
Goblin
Greedling
Hanger
Hopper
Horf
Imp
Knight
Leaper
Leech
Mom's Dead Hand
Mom's Eye
Mom's Hand
Mulligan
Nerve Ending
Pale Fatty
Parabite
Pooter
Portal
Psy Horf
Rage Creep
Ragling
Red Host
Ring of Flies
Round Worm
Roundy
Spider
Squirt
Stoney
Sucker
Swarmer
Swarm of Flies
Trite
Tumor
Wizoob


Holy/Cursed Monsters
Holy/Cursed monsters are monsters with special effects that can be good or bad. These effects usually only take affect when a certain number is rolled. These were confirmed in an early live stream, but few have been seen. They can be identified with a white or purple background respectively.
Cursed Fatty
Cursed Gaper
Cursed Goblin
Cursed Keeper Head
Cursed Mom's Hand
Cursed Psy Horf
Cursed Tumor
Holy Bony
Holy Dinga
Holy Dip
Holy Keeper Head
Holy Mom's Eye
Holy Mulligan
Holy Squirt


Bosses
Strong enemies that always have a soul as a reward.
Blastocyst
Carrion Queen
Conquest
Daddy Long Legs
Dark One
Death
Delirium
Dingle
Envy
Famine
Fistula
Gemini
Gluttony
Greed
Gurdy Jr
Gurdy
Gurgling
Krampus
Lust
Mask Of Imfamy
Monstro II
Peep
Pestilence
Pin
Polycephalus
Pride
Scolex
Sloth
The Cage
The Fallen
The Haunt
War
Widow
Wrath


Mega Bosses
Mega Bosses are incredibly hard-to-fight versions of bosses, of which only a few appear in the game. There are 4 of these in the game, Hush being Gold Box exclusive. These Mega bosses include: Mom!, Satan!, Hush, and The Lamb. They are high risk, and high reward Bosses to fight. They all drop 2 souls. (The Lamb is an exception, as you gain one soul from him, but also steal one from another person)
Hush
Isaac!
Mom's Heart


Random Happenings
Random Happening are cards that you don't fight, but affect you, you might have a choice.
Ambush
Angel Room
Boss Rush
Chest
Cursed Chest
Dark Chest
Devil Deal
Gold Chest
Greed!
Head Trauma
Holy Chest
I Am Error
I Can See Forever
Mega Troll Bomb
Secret Room
Shop Upgrade
Spiked Chest
Troll Bombs
We Need to go Deeper
XL Floor


Curses
Curses are negative effects that effect you until you die.
Curse of Amnesia
Curse of Blood Lust
Curse of Fatigue
Curse of Greed
Curse of Impulse
Curse of Loss
Curse of Pain
Curse of Tiny Hands
Curse of the Blind


Additional notes
- Delirium doesn't fit anywhere on the list, as said in a tweet by Edmund, yet still acts like a monster card, and is in the monster deck.
- If a card has has "Draw #" or "Loot # on it's reward, it's always referring to Loot Cards